

HEALTH: An introduction to yoga poses
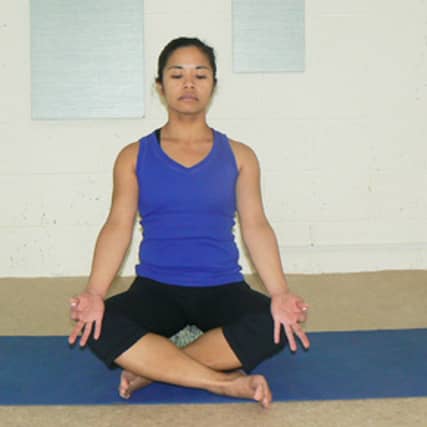

Yoga teacher Lee Kennedy introduces a basic pose that strengthen the back, stretch knees and ankles – and calm the mind.
Yoga
Lee Kennedy
Before beginning, I would like to extend my gratitude once more to my students, current and past, for taking the time to email me their thoughts and feelings on yoga. They have helped keep these fortnightly columns real, attainable and local.
As I mentioned in our last column, one of the many challenges that yoga brings is moving that ‘being in the now’ feeling into the rest of our day. So, here that journey begins.
From now until the end of this year, I will be slowly introducing basic yoga poses, simple exercises and simple breathing techniques. These postures (asana) and breathing techniques (pranayama) will be explained step by step with the help of photographs at each different stage. You’ll be told about the props you’ll need, as well as variations for those who may want to work a little bit deeper within a pose. Most of these simple physical exercises are suitable for all, but will they come with contraindications and cautions that should be adhered to.
Every fortnight I will describe a follow-on pose from the last.
Tips
Given that the body is stiffer in the morning and limbers up throughout the day, practitioners alternate morning and evening times to practice.
Like any training or exercise, refraining from eating 1-2 hrs before starting.
Sukhasana (easy pose, pictured)
Props: folded blanket or book to sit on.
Cross your shins, widen your knees, and place each foot beneath the opposite knee as you bend your knees and fold the legs in toward your torso.
Relax the feet so their outer edges (little toe side) rest comfortably on the floor and the inner arches settle just below the opposite shin.
In Sukhasana, there should be a comfortable gap between the feet and the pelvis.
As with all seated postures, you should sit with your pelvis in a relatively neutral position. To find neutral, press your hands against the floor and lift your sitting bones slightly off the support (the blanket or book). As you hang there for a few breaths, make your thigh bones heavy, then slowly lower your sitting bones lightly back to the support, now be aware that you are sitting on both sitting bones evenly.
Either place your thumb and first finger together resting the palms of your hands on your thighs, or rest your hands on your knees, palms facing down.
Lengthen your tail bone toward the floor, draw your shoulder blades down towards the back of your waist, and lengthen your front torso perpendicular to the floor. Avoid overarching your lower back or sticking your lower front ribs forward.
You can sit in this position for as long as you are comfortable, but if you practice this pose regularly, be sure to alternate the cross of the legs. Try to cross the right shin in front of the left on even-numbered days, and cross the left shin in front of the right on odd-numbered days.
Benefits
Calms the brain
Strengthens the back
Stretches the knees and ankles
Contraindications and Cautions
Knee injury